

Welcome to your comprehensive guide on outdoor lighting placement! Discover expert tips for illuminating your property effectively․ We’ll explore strategies from prioritizing safety and visual appeal to highlighting landscaping․ Let’s dive in and brighten your outdoor spaces!

Outdoor lighting is more than just illuminating the darkness; it’s about creating ambiance, enhancing safety, and accentuating the beauty of your property․ Effective placement involves understanding the interplay of light and shadow, the architectural nuances of your home, and the unique characteristics of your landscape․ From the welcoming glow of front door lights to the subtle illumination of garden pathways, each fixture plays a crucial role in the overall design․ Proper placement considers factors like fixture height, spacing, and angle to achieve optimal results․ Whether you’re looking to deter intruders, showcase your favorite plants, or simply create a relaxing outdoor environment, thoughtful lighting placement is key․ This guide will provide you with the knowledge and techniques to transform your outdoor spaces into captivating and functional areas․ Remember, a well-lit exterior not only enhances curb appeal but also adds value and security to your home․ So, let’s embark on this illuminating journey!

General Placement Strategies
Effective outdoor lighting hinges on strategic placement․ Consider safety first, illuminating pathways and entrances․ Enhance visual interest by playing with shadows and angles․ Finally, highlight your landscape’s best features, creating a captivating nighttime ambiance․
Prioritizing Safety in Lighting Placement
Safety is paramount when planning outdoor lighting․ Begin by illuminating walkways and paths to prevent trips and falls․ Ensure steps and changes in elevation are clearly visible by using dedicated step lights․ Driveways also require ample lighting to guide vehicles and pedestrians safely․ Position path lights evenly on both sides of walkways for clear visibility․
Consider motion-sensor lights for added security․ These lights deter potential intruders by automatically illuminating when movement is detected․ Proper placement near entry points, such as doors and windows, can significantly enhance your home’s security․
Avoid glare that can impair vision․ Shielded fixtures direct light downwards, minimizing upward light pollution and maximizing ground illumination․ Regularly inspect and maintain your outdoor lighting system to ensure all fixtures are functioning correctly․ Replace any burned-out bulbs promptly and check for damaged wiring to prevent hazards․ By prioritizing these safety measures, you can create a secure and well-lit outdoor environment․
Creating Visual Interest with Shadows and Angles
Use outdoor lighting to craft visually appealing effects through shadows and angles․ Employ silhouetting by positioning lights behind objects, casting dramatic outlines against surfaces․ Spotlights, strategically angled, can highlight textures and forms․ Avoid grouping fixtures; instead, position several spotlights at varying angles for a dynamic effect․
Experiment with uplighting to accentuate trees and architectural features․ Direct light upwards to emphasize height and create a sense of grandeur․ Downlighting, conversely, mimics moonlight, adding a soft, diffused glow․
Consider the interplay of light and shadow throughout your landscape․ Position lights to create intriguing patterns and depth․ Adjustable fixtures allow you to fine-tune the direction and intensity of light, enhancing the visual impact․ Remember to consider the overall aesthetic, aiming for a balanced and harmonious composition․ Thoughtful placement of lighting transforms your outdoor space into a captivating visual experience․ Shadows and angles are your artistic tools for creating a unique outdoor atmosphere, ensuring a captivating interplay of light and dark․
Highlighting Key Landscaping Features
Elevate your landscape’s beauty by highlighting key features with strategic lighting․ Use spotlights to accentuate focal points like statues, fountains, or unique trees․ For trees with canopies, consider mounting lights high up to create a natural, moonlit effect․ Illuminate pathways with path lights, ensuring both safety and aesthetic appeal․ Position lights evenly along both sides of the walkway for clear visibility․
Consider the color temperature of your lights․ Warmer tones can enhance the natural hues of plants and flowers, while cooler tones can create a more modern, dramatic effect․ Avoid placing lights under low shrubs or tall grasses to ensure a clear path for the light beam․
Uplighting can dramatically transform trees and architectural elements, while downlighting provides a soft, ambient glow․ Use a combination of techniques to create depth and visual interest․ Remember to consider the overall design of your landscape when choosing lighting placements․ The goal is to enhance, not overwhelm, the natural beauty of your outdoor space․ Thoughtful lighting brings your landscape to life, creating a captivating and inviting atmosphere․
Specific Lighting Applications
Let’s explore specific lighting applications! We will cover front doors, paths, driveways, decks and steps․ Learn how to best illuminate each area for safety, functionality, and aesthetic appeal․ Let’s brighten these areas!
Front Door Lighting Placement
Proper front door lighting is crucial for safety and curb appeal․ Focus on illuminating the entrance effectively․ When mounting exterior wall lights beside the door, position fixtures at eye level, ideally between 60 and 65 inches from the ground․ For a balanced look, consider using fixtures that are approximately 1/4 to 1/3 the height of your front door․
If installing lights on both sides of the door, ensure they are positioned symmetrically․ For horizontal spacing, maintain a minimum of 6 inches between the door frame and the edge of each fixture to ensure optimal illumination․ Avoid grouping fixtures to create a bright spotlight effect․ Different angles can provide better lighting․ Careful placement enhances visibility and aesthetic․
These considerations ensure your front door is well-lit, welcoming, and secure․ Remember to select fixtures that complement your home’s style and provide ample light for clear visibility․ Consider the overall aesthetic and functionality when making your choices․
Sizing Fixtures Relative to the Door
Selecting the right size fixtures for your front door is essential for achieving a balanced and aesthetically pleasing look․ As a general rule, choose outdoor lighting fixtures that are approximately 1/4 to 1/3 the height of your front door․ This proportion ensures that the lights complement the door without overwhelming it․
For single fixtures, consider the overall width of the entryway to maintain visual harmony․ If you have a double door, you might opt for slightly larger fixtures to balance the increased width․ Avoid selecting fixtures that are too small, as they may appear insignificant and fail to provide adequate illumination․ Conversely, oversized fixtures can dominate the facade and detract from the door’s architectural details․
Remember to consider the style of your home when choosing the size and design of your lighting fixtures․ A cohesive design will enhance your home’s curb appeal and create a welcoming entrance for guests․ Proportion is key to a well-lit and visually balanced front door area․
Optimal Mounting Height for Sidelights

Achieving the optimal mounting height for sidelights is crucial for both aesthetics and functionality․ When mounting exterior wall lights beside a door, position the fixtures at eye level, generally between 60 to 65 inches from the ground․ This height ensures that the light is effectively distributed and provides ample visibility for anyone approaching the entrance․
Maintaining this height also helps to prevent glare, which can be both uncomfortable and reduce visibility․ Mounting the fixtures too high can leave the area directly around the door in shadow, while mounting them too low can create an uneven distribution of light․
Consider the height of the tallest person in your household to ensure that the lights are not mounted too low, which could lead to accidental bumps or obstructions․ By positioning the sidelights at the correct height, you can create a welcoming and well-lit entryway that enhances both safety and curb appeal․ Proper mounting height is a key element in effective outdoor lighting design․
Horizontal Spacing from the Door Frame
Proper horizontal spacing of sidelights from the door frame is essential for achieving balanced illumination and visual harmony․ A general guideline is to maintain a minimum of 6 inches between the door frame and the edge of the light fixture․ This spacing ensures that the light effectively illuminates the area around the doorway, providing ample visibility for entry and exit․
Adequate horizontal spacing also prevents the light fixtures from appearing cramped or overwhelming relative to the door․ Overcrowding the doorway with lights can create an unbalanced aesthetic, while insufficient spacing may result in inadequate lighting coverage․
Consider the size and style of your door and light fixtures when determining the optimal spacing․ Larger doors may require slightly wider spacing to maintain proportion, while smaller fixtures may benefit from a closer placement to avoid looking isolated․ By carefully considering horizontal spacing, you can create a well-lit and visually appealing entryway that enhances the overall curb appeal of your home․ Balancing aesthetics with functionality is key to successful outdoor lighting design․
Path and Driveway Lighting

Effective path and driveway lighting enhances safety, security, and aesthetic appeal․ Path lights should be placed evenly along both sides of the walkway to ensure clear visibility․ Traditional path lights with domes are designed to direct light downwards, minimizing glare and maximizing illumination of the walking surface․
For driveways, consider using a combination of post lights and ground-level fixtures to create a welcoming and well-lit entrance․ Post lights can be strategically positioned along the driveway to define its edges and provide ambient lighting, while ground-level fixtures can highlight landscaping features or architectural details․
Spacing between path lights will depend on the brightness of the fixtures and the width of the path․ As a general rule, space lights approximately 6 to 8 feet apart to ensure consistent illumination․ When selecting path and driveway lights, prioritize durable materials that can withstand outdoor conditions, such as cast aluminum or stainless steel․ Proper installation and maintenance are essential for ensuring the longevity and performance of your path and driveway lighting system․
Spacing for Path Lights
Proper spacing for path lights is crucial for achieving optimal illumination and safety along walkways․ The distance between path lights should be carefully considered based on several factors, including the brightness of the fixtures, the width of the path, and the surrounding landscape․ Generally, a spacing of 6 to 8 feet is recommended for most standard path lights․

For wider paths or areas with dense vegetation, closer spacing may be necessary to ensure adequate light coverage and prevent dark spots․ Conversely, for narrower paths or in areas with reflective surfaces, wider spacing may be sufficient․ It’s essential to test the lighting configuration at night to assess the effectiveness of the spacing and make adjustments as needed․
Consider using a staggered arrangement for path lights to create a more visually appealing and balanced lighting effect․ Staggering the lights on either side of the path can also help to eliminate harsh shadows and provide more uniform illumination․ Regularly inspect and maintain path lights to ensure they are functioning correctly and free from obstructions, such as overgrown plants or debris․
Deck and Step Lighting

Deck and step lighting are essential elements for enhancing safety and ambiance in outdoor living spaces․ Strategically placed lights not only prevent accidents but also create a welcoming atmosphere for evening gatherings․ When planning deck lighting, consider illuminating key areas such as railings, seating areas, and any architectural features you wish to highlight․
Step lighting is particularly important for ensuring safe navigation on stairs and elevated walkways․ Options include recessed lights installed directly into the steps, or surface-mounted fixtures attached to the risers or sides of the steps․ Choose fixtures that provide a soft, diffused light to avoid glare and ensure comfortable visibility․

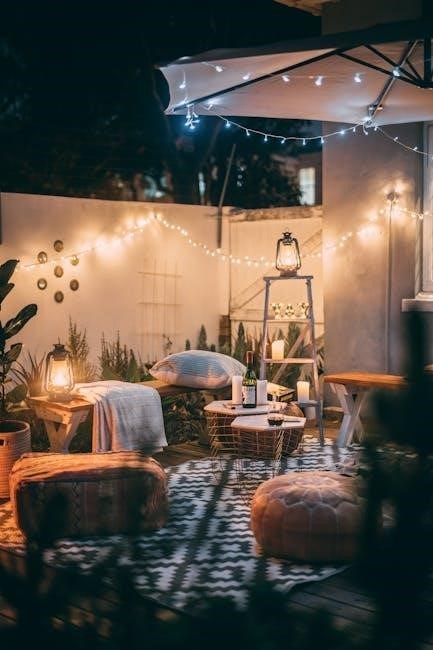
For decks, consider incorporating a mix of ambient, task, and accent lighting to create a layered effect․ Ambient lighting can be achieved with string lights or post-mounted lanterns, while task lighting is useful for cooking or dining areas․ Accent lights can be used to highlight plants, sculptures, or other decorative elements․ Be sure to use weather-resistant fixtures suitable for outdoor use and follow all electrical safety codes․
Installing Step Lights for Safety
Proper installation of step lights is crucial for ensuring safety and preventing accidents on outdoor stairs․ Begin by selecting low-voltage LED fixtures, as they are energy-efficient, long-lasting, and provide ample illumination without being overly bright․ Determine the optimal placement for each light, typically on the riser or the side of each step, ensuring even distribution of light along the staircase․
When mounting the fixtures, follow the manufacturer’s instructions carefully and use appropriate hardware for the surface material․ Recessed lights should be flush with the step surface to avoid creating a tripping hazard․ For surface-mounted lights, ensure they are securely attached and positioned to direct light downwards, illuminating the tread of the step below․
Consider the spacing between lights to achieve consistent illumination and avoid dark spots․ Test the lights at night to ensure they provide adequate visibility without causing glare or discomfort․ Conceal wiring and connections properly to protect them from the elements and prevent electrical hazards․ By following these guidelines, you can create a safe and well-lit staircase that enhances the beauty and functionality of your outdoor space․